

Main interface
In the main interface there are 5 visible areas:
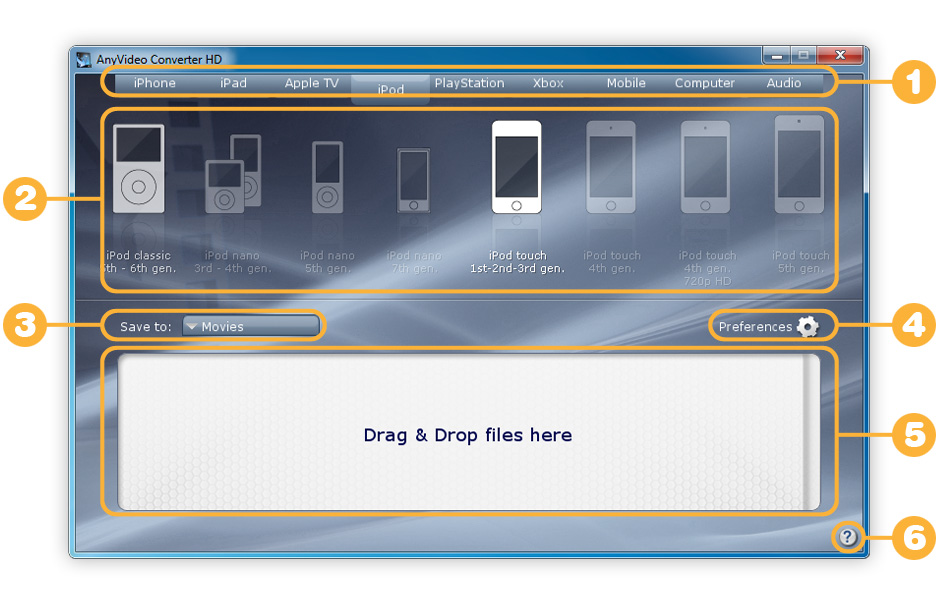
1Main Device Area
In this area you can choose your device family from tab menu.
2Device Area
In this area you can choose your device and the resolution you want.
3Save
With "Save to": menu you can choose where save the converted file. All converted file are saved in this folder. You can choose an option from:
- Movie - The converted file is saved on your movie folder
- Documents - The converted file is saved on your documents folder
- Desktop - The converted file is saved on your desktop
- Source folder - The converted file is saved in the same location as the original file
- Choose folder - You can choose any folder on your computer or a network folder.
4Preferences
From preferences you can set these options.
Send to iTunes
With this option enabled, every converted files are automatically imported into your iTunes movie library. This option work only if you select an Apple device.
Remux when possible
With Remux option enabled, the application analize the file before convertion and choose the fastest way to convert the selected video. This function works only with some file. Usually this option is the best way to convert your video, however sometimes you must disable Remux option to convert some movies.
Force audio Sync
With this option you can solve some issue with audio/video sync. If your converted file have an audio/video sync issue, you can try to enable this function to fix it.
Advanced mode
By selecting "advanced mode" you can choose an audio language and subtitle for every file you convert.
Multichannel Audio*
This ComboBox allow you to chose how should be converted the 5.1 audio track. There is 4 options:
- stereo: Selecting this option a multichannel audio track will be converted mixing all channels into a stereo audio track
- 5.1 AAC: Selecting this option a multichannel audio track will be converted in 5.1 AAC audio track
- Stereo + 5.1 AC3: Selecting this option a multichannel audio track will be converted into 2 audio tracks. One is mixed down all channels to stereo AAC. The other track will be a 5.1 AC3 audio track very usefull for Apple TV passtrough digital audio output
- 5.1 AC3: Selecting this option a multichannel audio track will be converted in 5.1 AC3 audio track very usefull for Apple TV passtrough digital audio output
* This option is designed to take advatage of digital audio output of devices like Apple TV and Sony PlayStation.
CPU Usage
Sometime you could need to use less CPU during conversion process. This option is designed to offload CPU work.
5Drag & Drop area
Here you can drag & drop your video file to convert. In this area you can drag & drop a single file or multiple files for batch conversion. If you are in Standard Mode the conversion start automatically. If you are in Advanced mode, the conversion start only when you press "start conversion" button.
6Product Activation and Help
Here you can:
- View this online help
- Activate AnyVideo Converter HD
AnyVideo Converter HD allow 15 free conversion. After this trial period, is necessary to buy a full license.
To buy AnyVideo Converter HD you can go here: Avangate secure
After buying AnyVideo Converter HD, you can enter your license key to remove all limitations.
This is a step by step guide to activate your AnyVideo Converter HD
1) Download a copy of AnyVideo Converter HD
2) Go here to buy a license key Buy Now from Avangate secure
3) Follow the instructions to complete your order
4) After payment, you receive an e-mail with your license key
License key is a 32 character string like this: 2NJID2E0923R0JDWOJ2ER09WER0W2EFE
5) Copy the license key into the "input activation area" edit box
6) Press "Activate" button
7) Wait Activation process (activation process is a green progress bar under "Input activation" area)
8) After Activation process (this will take about 5 seconds), your copy of AnyVideo Converter HD is activated.
NB: if the Activation process fail, read the error code and contact us here: Support
How to convert a movie
Convert a movie (standard mode)
To convert a movie, you can follow these simple steps:
- Select your target device
- Select destination folder
- Drag & drop your files into "drag & drop" area
Convert a movie selecting audio language or subtitle (advanced mode)
To convert a movie selecting audio language or subtitle, you can follow these simple steps:
- Select your target device
- Select destination folder
- Go to preferences menu and select "advanced mode"
- Drag & drop your files into "drag & drop" area
- Click on
 "preferences icon" on the right side of the file name
 - Choose from "Audio tracks" menu the audio language you want
- Choose from Subtitle tracks menu, the subtitle you want
- Close file preferences menu by pressing a
 icon
icon - Press Start conversion
Preferences
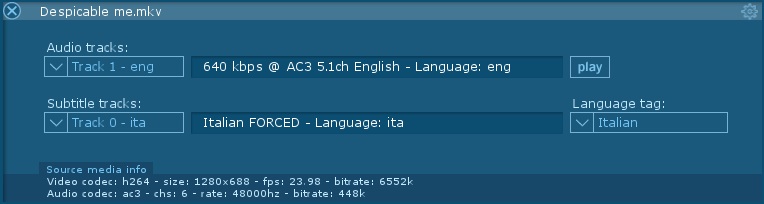
Audio Language Option
If your movie have multiple audio tracks AnyVideo Converter HD select automatically the primary audio language.
You can change this option using "advanced mode".
Go to "Preferences" panel and select "advaced mode".
Now, when you drag & drop a file into "drag & drop" area the file will be queued, in this state you can edit "audio language" settings for every single file from the preferences icon, on the right side of the file name.
In the audio track menu are showed all available audio languages for the movie.
The "auto" option select the primary language available.
If you see more than one audio language in menu, you can choose one of it.
Sometimes there isn't a language description in the original file.
When the audio language track doesn't have a description, you can choose one, than press "play" button to have a preview of movie with the selected audio language.
Subtitle Option
AnyVideo Converter HD convert movie without subtitle for default.
You can change this option using "advanced mode".
Go to "Preferences panel" and select "advaced mode".
Now, when you drag & drop a file into "drag & drop" area the file enter in queue mode.
You can edit subtitle settings for every single file from a preferences icon, on the right side of file name.
If the movie have some subtitles tracks, you can view all subtitles as list in "subtitle" track menu.
If you want you can add subtitle track by an external .srt or .ttxt file.
If you add a subtitle from external file, you must set a "language tag".
When you play your movie in a device, the subtitle will be showed by selecting the subtitle language from a device menu.
For example:
- If you want to add a subtitle to EPISODE_01.avi file, you must have EPISODE_01.srt file (or EPISODE_01.ttxt file).
- Swich to "Advanced mode" by selecting it from "preferences".
- Add EPISODE_01.avi into AnyVideo Converter HD drag & drop area.
- Press preferences icon on the right side of the file name.
- Select "load subtitle file" from "subtitle tracks" menu.
- Select your external subtitle file.
- Choose a "language tag".
- Close preferences panel by pressing icon.
- Press start conversion.
Remux when possible
A video file is composed by a video track and an audio track.
To be played in a device, both tracks must be compatible with it.
Sometimes only one track need to be converted.
Using Remux function, AnyVideo Converter HD analize the original file tracks before convertion, and convert only necessary track.
If is necessary to convert only audio track (for example), the conversion is very fast, and video quality is the same as the orginal.
Remux option is enabled by default.
However sometime the original file appears as a Remuxable file, but this is not true.
Unfortunally is not possible to know this before starting conversion.
In this case you will notified with a red error message.
Try to disable Remux option and drag and drop another time the file to convert.
Advices
Using Remux you can save a lot of conversion time selecting a right output format.
If the source has a resolution of 1080p and can be converted using remux, the best choice for output is 1080p (the video will not be resized).
If the source has a resolution of 720p and can be converted using remux, the best choice for output is 720p or 1080p (the video will not be resized).
Example of .mkv conversion
File .mkv 1080p
File .mkv 720p
File .mkv 576p
File .mkv 480p
Recommended 1080p
Recommended 720p or 1080p
Recommended 720p or 1080p
Recommended 480p, 720p or 1080p
Force audio sync
This option is available to solve some issue with audio/video synchronization.
Try this option only if your movie have audio not sychronized with video.
Usually this option is not necessary.
This option is deselected by default.
 get AnyVideo Converter HD now